Cropping image using jQuery in asp.net
Upload and Crop Images using jQuery in asp.net with C#:
In this post we describe image uploading and cropping by
using Jquery in asp.net web application. Many times we see on many web site basically
social networking and other site which gives the facility of image uploading and
cropping for registration of user on
website, they give cropping facility when we upload image on web page where we
upload profile pic. In the asp.net we can perform this type of work also by
using jquery or without jquery. As we know that jquery have many advantages
like fast, good look and fill and jQuery is a very fast, feature-rich. Jquery gives
small scripting. In this programming we also give introduction of Jquery with
asp.net uses of Jquery in asp.net and Apply Jquery on asp.net pages. Here we
give some important post list that is related to jqury in asp.net with different-2
Example.
JQuery related Posts in asp.net tutorial:
- Check Uncheck all asp.net CheckBox in asp.net using jQuery
- Example of jQuery Validate on Radiobuttonlist in Asp.Net using C#
- Example jQuery Validate on CheckBoxList using C#
- Check Uncheck all html CheckBox controls using jQuery:
- fill data into Dropdown list by using Jquery
- Validate ASP.Net RadioButtonList using JavaScript Example
- Example of jQuery Validate on Radiobuttonlist in Asp.Net using C#
- Example jQuery Validate on CheckBoxList using C#
- Check Uncheck all asp.net CheckBox in asp.net using jQuery
- Check Uncheck all html CheckBox controls using jQuery:
- Asp.net CheckBoxList using jQuery.
Image Crop and Upload with jQuery in asp.net:
Here I will explain how to crop image in asp.net using jQuery.
I am going to explain How to crop image and save the cropped image using
asp.net & jquery.
jQuery Crop Image in Asp.net:
jQuery Crop Image in Asp.net web application using Jcrop
jQuery or jQuery Image Cropper with
Uploader or Image Upload with preview and crop in web site or Image Cropping inASP.Net Using jQuery and jCrop in asp.net website, many other types we search
on google for solving this type of Problem. Here we give some code of segment
and try to solve these questios.
Code for jQuery Crop Image in Asp.net:
CropAndSaveImageCSharp.aspx page code Example:
<%@ Page
Language="C#"
AutoEventWireup="true"
CodeFile="CropAndSaveImageCSharp.aspx.cs"
Inherits="CropAndSaveImageCSharp"
%>
<!DOCTYPE html PUBLIC "-//W3C//DTD
XHTML 1.0 Transitional//EN" "http://www.w3.org/TR/xhtml1/DTD/xhtml1-transitional.dtd">
<html xmlns="http://www.w3.org/1999/xhtml">
<head id="Head1" runat="server">
<title></title>
<script type="text/javascript"
src="http://code.jquery.com/jquery-1.8.2.js"></script>
<script src="Scripts/jquery.Jcrop.js"
type="text/javascript"></script>
<link href="CSS/jquery.Jcrop.css"
rel="stylesheet"
/>
<script language="javascript"
type="text/javascript">
$(document).ready(function () {
$('#<%=imgToCrop.ClientID%>').Jcrop({
onSelect: getAreaToCrop
});
});
function getAreaToCrop(c) {
$('#XCoordinate').val(parseInt(c.x));
$('#YCoordinate').val(parseInt(c.y));
$('#Width').val(parseInt(c.w));
$('#Height').val(parseInt(c.h));
}
</script>
</head>
<body>
<form id="form1" runat="server">
<div style="width: 900px" align="center">
<fieldset>
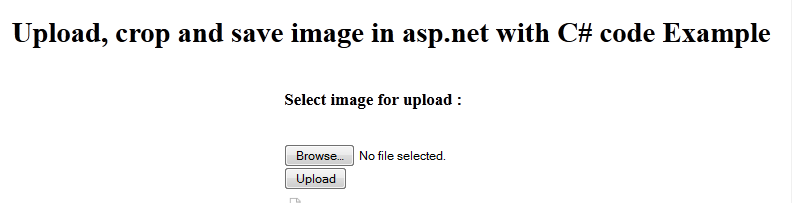
<h1>Upload, crop and save image in asp.net with C#
code Example</h1>
<table>
<tr>
<td>
<h3>Select image for upload :</h3>
<br
/>
<asp:FileUpload ID="FileUpload1" runat="server" />
<br
/>
<asp:Button ID="Upload" runat="server" Text="Upload" OnClick="Upload_Click" />
</td>
</tr>
<tr>
<td
colspan="">
<asp:Image ID="imgCropped" runat="server" />
</td>
</tr>
<tr>
<td
colspan="">
<asp:Label ID="lblMsg" runat="server" ForeColor="Red" />
</td>
</tr>
<tr>
<td
colspan="">
<asp:Button ID="btn_Reset" runat="server" Text="Reset" Visible="false" OnClick="btn_Reset_Click" />
</td>
</tr>
</table>
<asp:Panel ID="pnlCrop"
runat="server"
Visible="false">
<table>
<tr>
<td>
<asp:Image ID="imgToCrop"
runat="server"
/>
</td>
</tr>
<tr>
<td>
<asp:Button ID="btnCrop"
runat="server"
Text="Crop and
Save"
OnClick="btnCrop_Click"
BackColor="#990000"
ForeColor="White"
Height="37px"
/>
</td>
</tr>
<tr>
<td>
<input id="XCoordinate"
type="hidden"
runat="server"
/>
<input id="YCoordinate"
type="hidden"
runat="server"
/>
<input id="Width" type="hidden"
runat="server"
/>
<input id="Height" type="hidden"
runat="server"
/>
</td>
</tr>
</table>
</asp:Panel>
</fieldset>
</div>
</form>
</body>
</html>
 |
| jQuery for Cropping image in asp.net |
Crop And Save Image CSharp page C# code Example:
using System;
using System.Collections.Generic;
using System.Linq;
using System.Web;
using System.Web.UI;
using System.Web.UI.WebControls;
using System.IO;
using System.Drawing;
public partial class CropAndSaveImageCSharp
: System.Web.UI.Page
{
protected void
Upload_Click(object sender, EventArgs e)
{
string file = string.Empty;
string file_Path = string.Empty;
string extension = string.Empty;
try
{
//Check if Fileupload control has file in it
if (FileUpload1.HasFile)
{
// Get selected image extension
extension = Path.GetExtension(FileUpload1.FileName).ToLower();
//Check image is of valid type or not
if (extension == ".jpg" || extension == ".jpeg")
{
//Cretae unique name for the file
file = Guid.NewGuid().ToString() +
extension;
//Create path for the image to store
file_Path = Path.Combine(Server.MapPath("~/Images"), file);
//Save image in folder
FileUpload1.SaveAs(file_Path);
//Show the panel and load the uploaded image
in image control.
pnlCrop.Visible = true;
imgToCrop.ImageUrl = "~/Images/"
+ file;
}
else
{
lblMsg.Text = "Please select jpg, jpeg
Image only ";
}
}
else
{
lblMsg.Text = "Select file and just
upload";
}
}
catch (Exception
ex)
{
}
finally
{
extension = string.Empty;
file = string.Empty;
file_Path = string.Empty;
}
}
protected void
btnCrop_Click(object sender, EventArgs e)
{
string cropped_File_Name = string.Empty;
string cropped_File_Path = string.Empty;
//get uploaded image name of strored name
string file_Name = Path.GetFileName(imgToCrop.ImageUrl);
string file_Path = Path.Combine(Server.MapPath("~/Images"), file_Name);
if (File.Exists(file_Path))
{
//Get the image from UploadedImages folder.
System.Drawing.Image orgImg =
System.Drawing.Image.FromFile(file_Path);
Rectangle areaToCrop = new
Rectangle(
Convert.ToInt32(XCoordinate.Value),
Convert.ToInt32(YCoordinate.Value),
Convert.ToInt32(Width.Value),
Convert.ToInt32(Height.Value));
try
{
Bitmap bitMap = new Bitmap(areaToCrop.Width,
areaToCrop.Height);
using (Graphics
g = Graphics.FromImage(bitMap))
{
g.DrawImage(orgImg, new Rectangle(0, 0, bitMap.Width, bitMap.Height),
areaToCrop, GraphicsUnit.Pixel);
}
cropped_File_Name = "crop_"
+ file_Name;
//Create path to store the cropped image
cropped_File_Path = Path.Combine(Server.MapPath("~/Images"), cropped_File_Name);
//save cropped image in folder
bitMap.Save(cropped_File_Path);
orgImg.Dispose();
bitMap = null;
//Now you can delete the original uploaded
image from folder
File.Delete(file_Path);
pnlCrop.Visible = false;
lblMsg.ForeColor = Color.Red;
lblMsg.Text = " saved
successfully";
//Show cropped image on asp.net web page.
imgCropped.ImageUrl = "~/Images/"
+ cropped_File_Name;
//Show Reset button on page
btn_Reset.Visible = true;
}
catch (Exception
ex)
{
}
finally
{
file_Name = string.Empty;
file_Path = string.Empty;
cropped_File_Name = string.Empty;
cropped_File_Path = string.Empty;
}
}
}
protected void
btn_Reset_Click(object sender, EventArgs e)
{
reset();
}
public void reset()
{
imgCropped.ImageUrl = "";
lblMsg.Text = string.Empty;
btn_Reset.Visible = false;
}
}
Download Example code here: https://drive.google.com/file/d/0B77RzHHUDcrta2JoLVpMbWZ6S2c/edit?usp=sharing
Here we give the list of Examples in asp.net:
- Introduction of Asp.net grid view Control.
- Example of Templatefield in gridview .
- Example of DropDownList inside GridView
- Check box in ASP.NET GridView
- How to Bind Gridview Form database.
- Show gridview Row Details And Give Example.
- Example of Templatefield in asp.net gridview.
- Example of DropDownList inside GridView control
- Introduction of Asp.net grid view Control.
- Example of C# for Bind Data to asp.net Textbox inside gridview control
- Bind Data to asp.net textbox control in inside of gridview Using C# Example
- Add ListItem in DropDownList asp.net c# Example
- Drop Down List control of asp.net
- Select option to the user from many items.
- Display tooltip from database for dropdownlist items in asp.net c# example
- Show tooltip dropdownlist items by mouse over event using C# example
- Example of Adding ToolTip for each Dropdown List Item in C#
I'm on the fence about this, while more customization is good, I have a feeling this is a "in-progress" update, it just feels incomplete and half-way there.
ReplyDeleteWe use badge layout for apps on design approvals (visual projects), so the image being displayed is important. Old layout "feels like" it had larger images,
maybe because the images were cropped more loosely so it's easier to tell which project it was at quick glance. Now the image is cropped closer, making it
harder to scan thru at quick glance. I find myself needing to click into the project more often than usual. Which makes the whole user experience less
efficient.
I have a couple suggestions that might make it work better:
1. Increase the height of the window the cover image is being displayed.
2. Let us to choose which image to be displayed as "cover" (like how Pinterest handles cover images of each board, was hoping for this for a long time)
3. Let us adjust which part of the image to show and how tight or loose the crop is (with a fixed window, let us move the image around and maybe enlarge or
shrink it to control what shows thru the window. Pinterest does a limited form of this, which is very useful in making the cover image relevant)
4. Allow Cover Image to be ordered in different hierarchy (currently every element can be ordered differently except the Cover Image, it seems to be stuck
in the 2nd spot, would like the option to set it on another spot in the layout. This one seems like an easy fix, since you guys allow that for every other
element already)